

Presets recreated within my RGB controller
27/5/2016
You may have read about the presets function I added to my RGB controller a few months back .. it was horrible and literally straight after writing that post, I removed it. Tonight I decided to re-create it using a drop down box, and this time it works. I am re-using this RGB controller as the star of my research project - a required project to achieve the completion of high school, it might be cheating, but I don't care.
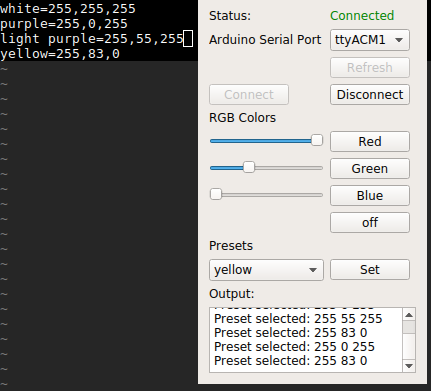


Research Project - How I plan for failure.
23/5/2016
I'd like to post this little masterpiece I just wrote up.
This is how I plan things - not good.
Failure seems to be my end goal, but is it?
 so, I really need to get a move on and get my research project done

I don't want to bother handing this project in if it isn't of above-medium standards because that makes all of this a waste of time.
If I ever think it is shit - I am dumping it all.
Or maybe I won't, I really, really don't care about any of it right now.
-------------------------------------------------------------------
Things I have finished:
        - RGB LED project.
                I have it done, all the programming etc, and it works. In fact, I have been using it for months - way before I even considered it for this subject, yes, i'm not going to learn anything.
Things I need to do:
        - proposal
                I want 1.5-2k words, maybe more.
        - research process
                I have no damn clue what I am going to do here. Have to pull something out of thin air I guess .. about 9 pages of it too.
        - log of every session
                This may actually be done legit, because, let's be honest, I've really done nothing, so the entries can be made up.. on the actual dates.
        - final outcome
        - review

So, what the hell is my final outcome anyway?
        - Website - static JS, HTML, CSS - NO PHP, sadly it needs to be handed in via USB.
                how will they view it?
                        - they will need to open a page called index.html in their browser .. if they cannot manage this I really don't care for their marks/grades
        - Video of the project (I am not a graphical artist/into video editing, it will be a horrible video - editing wise)
                (AFTER THOUGHT: the video will basically be a power point presentation, with little video clips and voice overs in it, that counts, right)
                what will it contain?
                        - Entire video will be voiced over
                        - brief introduction of myself? (seems kinda gay)
                        - motivation behind the project
                                should this be an outline of my proposal?
                        - graphical schematics of the project and UI designs with explanations of my reasons behind things, simmilar ot ins the proposal
                                these will be static images with voice over
                        - parts list
                                insert pictures of each part, maybe talk about their purpose
                        - show pictures of it being put together - of course I will have to take it apart and put it back together, because all of this is basically a lie
                        - talk about challenges I faced constructing it - I did encounter issues .. just not now, about 6 months ago when I originally made it maybe even longer, I hope they don't look at my blog media/posts about it
                will it be on YouTube?
                        - no, it will be an mp4 file located on the USB drive submitted


Small tantrum
20/5/2016
It has been a little while since my last blog post, and I have nothing to talk about.
I am stuck in a torrent of nothingness. Nothing excites me, nothing is making me happy. I am not progressing my skills in programming, nor am I progressing through school. Worse yet, I have been unable to maintain any form of 'skill' in counter strike. I cannot make the simpliest of kills - my aim is very off, my spray control is down-right embarassing and I am soon going to derank.
What does it take to be happy? Who knows, I certainly don't.
Maybe, just maybe I need to leave my computer for a little while and have some form of life experience - but that isn't going to happen. So here's to another week of mundane day-in-the-life animes desu and boredom.


CS:GO statistics
4/5/2016
A new item has found its way onto the side navigation bar of my website. Under the label "CS:GO statistics" you will find a page full of information taken from public Steam APIs, specifically that of Counter Strike Global Offensive. I have created a dynamic way to retrieve users statistics, all that is needed is their public Steam ID. I created this page to allow myself to compare my own statistics to that of my close gaming friends. It is ugly, but does the trick.
You can find the project on GitHub here.


Micro USB Digispark Pro issues and how I solved them
26/4/2016
EDIT: It seems communication via USB is possible via this library. I am as happy as ever!
EDIT: I shorted the board and it is dead, I give up on electronics.
Today I received a recent, off-the-whim Ebay purchase - a Digispark Pro microprocessor. The product was cheap and to be honest I kind of expected it to be a fake/remake (and to be honest I can't tell if it is). The one I purchased can be found here.
Like with everything in life I did zero research and happily accepted what the listing described to me - what a stupid mistake. I won't go into why it isn't what I expected, however, I can happily say THIS BOARD DOES NOT SUPPORT SERIAL COMMUNICATION! Be warned, don't learn the hard way and waste five dollars. (I bought this product for serial communication in a project, that to me is hilarious)
For once, however this post isn't about bitching, instead, it is how I managed to get code uploaded to this board via the Arduino IDE on a Linux system.
I am running a 64bit Arch Linux installation - this shouldn't really matter, however. If your problem is with Windows, I can't help you.
The first issue I encountered and the solution I found:
I can't find the board in the serial port list and dmesg gives me an output simmilar to this:

[369166.755711] usb 2-1.8: device not accepting address 87, error -32

[369166.755890] usb 2-1-port8: unable to enumerate USB device
When I encountered this error I had tried many things including changing USB port, micro USB cable and using another Linux system the result however, on each attempt was the same. It just didn't seem like it was working.
Now, the answer to this is not simple, and I won't be explaining it, but let it be known, this device does not appear as a standard ttyUSB device when in use. So, how do you upload code? Well, for five seconds upon initial USB connection your computer and thus the program used to upload code (more on this soon) can communicate with the board for a short ammount of time. I have found supposed libraries that allow you to communicate with the board via serial during use, however I have not tested nor used them and can't give an opinion on the subject. (see this for more information)
So, how do I fix the errors? You don't, I guess, it is supposed to do that, and even now, once I managed to get code running on the boad, the same errors occur. (probably due to this board not being meant to be connected via USB for anything more than code upload)
Great, we now know that we are not meant to see this board in our serial list and that dmesg errors are normal, but how do I upload code to the board?
Be warned, the fun starts now and I suggest you have some command line knowledge before continuing.
Now, the first thing that needs to be done is to set your Arduino IDE up to use the Digistump package that includes the piece of software that is the centre of this post, micronucleus.
You must at this point follow the tutorial here in its entirety!
If, after you follow the tutorial linked above you are able to upload code to your board without a hitch, great! You don't need to read on, go enjoy your new microprocessor.
however, if at this point the Arduino IDE spits out the following:
Warning: device with unknown new version of Micronucleus detected.

This tool doesn't know how to upload to this new device. Updates may be available.

Device reports version as: 2.2
You have a little work to do yet! But don't fret, the solution is simple.
It seems the version of the Micronucleus bootloader on Digispark boards (in my case at least) is newer than what comes with the Arduino software you installed earlier in this tutorial. To fix this issue, we just need to replace it with a newer version!
I'm going to go through the steps assuming you know what the commands do, if not, why are you playing with a microcontrller on Linux anyway?
First, we will make a directory in which we will install and compile the newer version of Micronucleus.
mkdir ~/compiled

mkdir ~/compiled/micronucleus
Next we will clone the Github repository of the project. I assume you have Git installed, if not, Google is your friend.
cd ~/compiled/micronucleus
Next we will compile the code into a binary that will replace the version in use now. I also assume you have development libraries installed.
git clone https://github.com/micronucleus/micronucleus/
cd ~/compiled/micronucleus/micronucleus-master/commandline/
make
Now the new version of Micronucleus is compiled and ready to be switched with the current version in use by the Arduino IDE. (your directory structure may differ sightly)
#backup the old micronucleus binary just in case we need it later
Now that an up to date version of Micronucleus is installed you should now be able to upload code to your Digispark microcontroller - well, I could at least!
mv ~/.arduino15/packages/digistump/tools/micronucleus/2.0a4/micronucleus ~/.arduino15/packages/digistump/tools/micronucleus/2.0a4/micronucleus_old
#copy our new compiled binary to replace the one we just backed up
cp ~/compiled/micronucleus/micronucleus-master/commandline/micronucleus ~/.arduino15/packages/digistump/tools/micronucleus/2.0a4/micronucleus
At this point I shall also warn you that I only managed to get Micronucleus running correctly if I opened the Arduino IDE as root, now, I suspect there is a solution for that out there, but I am yet to come accross it.
My experience using the Digispark pro microcontroller spans over a few hours as I received the product earlier today, but I have learnt a lot, and can hopefully help someone else one day.


How I use my new blogging system
11/4/2016
As pointed out in an earlier blog post I have recently transitioned from the blogging package known as WordPress to my own system that I feel is nicer to use and has little to no exploitable features.
I'd like to point out a few things - how I create a new blog post, how I display then on my page and how my site is setup.
Creating a new blog post
Creating a new post is easy due to how modular my system is - I will go into further detail of this modularity a little later. I create each and every blog post in its own php file in pure HTML (you can find them all here). I create and edit each blog post through an SSH connection using vim, I begin by copying the template.file into post_number.php and edit that file accordingly. This template has a basic blog post outline inside it and an example of how I should insert pictures into my media/posts with 404 fallbacks. Of course, having blogs be pure php files I can easily screw everything on my page up, and if a malicious blog post is written, do nasty things to my server. But with such risks comes the ease of backing up my media/posts and transfering them between servers.Displaying the media/posts on my blog page
The system I use for displaying my blog media/posts may not be very safe or light but my god does it make things easy. I begin by getting a count of all files inside the 'media/posts' directory that end in .php, this is NOT safe AT ALL, but I don't plan on putting anything in this directory other than media/posts. I then use a for loop to count down to 1 from the number of php file we collected before, using this decrementing number I use the php include funtion to paste the contents of that particular file into my blog. Pretty simple, yet effective.Here is an outline of the code that does this.
$total = count(glob("*.php", GLOB_BRACE));
for ($total; $total >= 1; $total--)
{
	include('' . $total . '.php');
}
How my website is setup
Moving from WordPress to my own setup allowed me to do things how I wanted - I prefer simple things, a simple website with a minimalistic design, and that is what I did.Directory structures
Inside my www root I have 3 directories of interest: blog, includes and css. They each contain exactly what is stated - the blog directory holds my blog and its files, the includes directory contains files that I use regularly for web-design (more on this later) and the css directory contains all my css source files.Inside my blog directory I have one other directory of interest: media/posts, which contains all of my blog media/posts and a single subdirectory named media, which, you guessed it, contains the media used inside my blog media/posts.
Files of interest and what they are used for
Generally, I have only two files of interest that may be of interest to you, one being the side navigation bar and my css source file.Located at /includes/navbar.php is thenavigation bar you see to your left when using my site. It is a single php file that is included when and where I need it. It derives its layout from the style.css file.
Located at /css/style.css is my css source file that dictates the look and feel of my website and blog; it is pretty simple but works great.
All files I need are referenced locally (for example ../../includes/navbar.php).
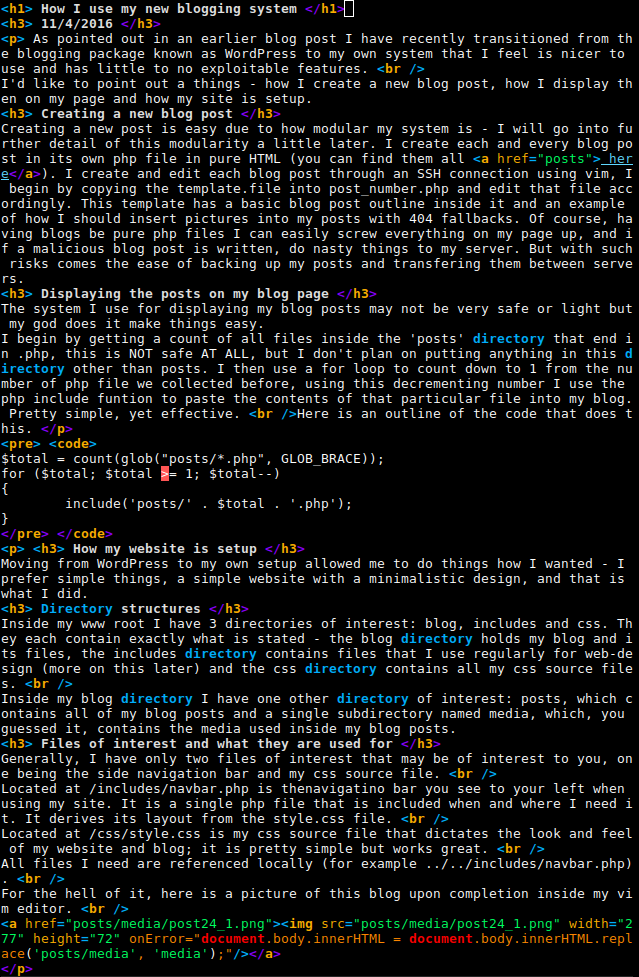
For the hell of it, here is a picture of this blog upon completion inside my vim editor. It may look like jargon to you, but it looks like a blog post to me. pssst, you can click on the image to get a larger view.


New server, now running my own e-mail server
8/4/2016
The world still exists, amazing.
have spent the last two days setting up and configuring a new server that will, in-time replace the one I was once using for everything.
Things setup:
- LAMP server (Apache, MySQL, PHP)
- IRC Server
- ZNC IRC bouncer
- Multiple adminstration panels
- My personal website/blog
- tankfootball.com and its website (the owner has to do his part yet)
- fail2ban
- Properly secured SSH/SFTP
- Mail server (virus scanning, spam filters, etc)
- xmx.fyi image hosting (still running on the old server)
- dummiesman.com (I need his cooperation, but he isn't responding)
- MySQL database migration (I am really just too lazy for this now)
I do need help however.
I need to know what e-mail hosting websites/services tag my email as spam/junk, it'd be great if you could send me an email at admin@danieljon.es naming the service you are using, i'll then reply and get you to tell me if it was junked or set as spam!
Services known to mark my e-mail as spam/junk:
- Outlook/Live mail
- Gmail


Rid myself of WordPress
31/3/2016
Over the past few days I have been converting my WordPress blog media/posts and have integrated them into
my own blog-like page.
WordPress is scary with all of its vulnerabilities, at least I now have security through obscurity!


My Arch Linux system - software I use daily and how I do what I do
12/3/2016
As a computer enthusiast I am quite surprised I haven't gone into detail about how I use my system and the hardware I run - so, lets do it.
A good start would of course be my physical hardware, I'm curently running:
- i7 3770k stock
- 16GB Hyper-X blu ddr3 memory
- Nvidia GTX 660Ti
- 128 GB main bootdrive SSD
- 2TB data storage HDD
- 1TB local backup HDD
- 2* Acer V243HQ monitors
- Razer Deathstalker keyboard
- Logitech G502 gaming mouse
- Logitech G230 headset
and, like any good *nix guy, a screenfetch (you can click on an image for a bigger view):
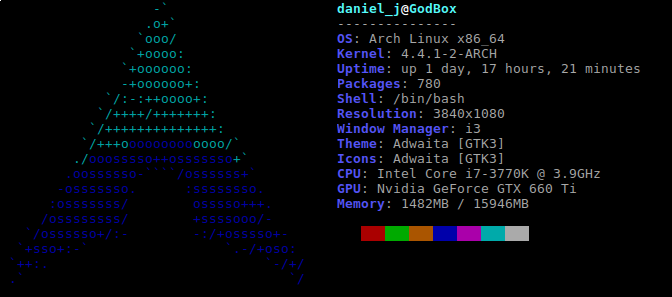
Now that the boring stuff is out of the way, lets get into the juicy software I use daily and the things I use them for!
[Operating System & Window Manager]
Arch Linux - Ah yes, good old Arch, I wont bother going into details, but it is what all the cool kids use ;)
i3 - This is a tiling window manager, of which I have covered before.
[Media & Media Management]
mplayer - this is a lightweight media player I use to watch .. things I have downloaded locally.
cmus - this is a terminal based msuic player that has one job, and does it exceedingly well, it plays my music! cmus has a nice commandline program that allows one to pause/play etc, this makes it easy to integrate into my key inputs such as my pause/play button etc
ranger - this is a terminal based file manager, I use it souley for selecting videos to play with mplayer, I do my general file management through the terminal.
[Entertainment]
ssh - Ah, good old ssh, I use this protocol to connect to my various servers and *nix boxes for remote server management, I, and many other people would be clueless as to what to do without ssh.
irssi - this is an Internet Relay Chat aka life client that I use over an ssh connection, I chat with many people around the world, I mainly hangout in programming/computer related channels, I also run my own IRC server, you can catch me over at irc.danieljon.es in #fun, identify yourself though, I remove anyone I don't know fast.
[Internet Browsing]
conkeror - this is an internet browser that is based upon FireFox and has the mind of a programmer - being lazy. It was created to be used without a mouse and has emacs-style key shortcuts, it has a large learning curve, but is very, very useful once you master it.
FireFox - this bastard program opens up when I open a link in irc because I'm too lazy to change the default program.
[Production]
lxterminal - this is a terminal emulator that I have recently decided to use, I was at one point using konsole, but its memory usage was just too high. This program is used to do many things: cmus, ranger, ssh, irssi, file management etc
vim - the enemy of emacs, this is an extremly powerful, terminal based text editor that I use for everything from writing notes, editing configuration files to programming in various languages - yes, I use vim instead of an actual IDE for programming, it just feels more comfortable to me.
[Local Media Server]
motion - I use motion on my media server to record via a camera mounted on my roof, it points towards our driveway, it is a good way to both know when people are coming/leaving and recording any no-gooders that may be in my area. I have it setup to take pictures when it detects motion - if I ever die bloody, check my media server for evidence!
apache2 - this is webserver software, I run it to provide me with an easy way to access my cameras stream.
tvheadend - this is DVR software, I use it to stream tv signals through my local network - although I don't really use it anymore.
If I have missed anything, I'll add to the list at a later date.
Resource usage:
I certainly am not lacking in resources, I generally keep my ram usage under 1gb, yes, I know, I have 16, I just like small numbers.
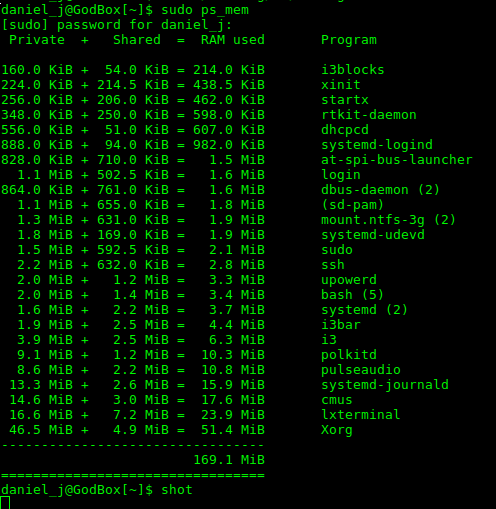
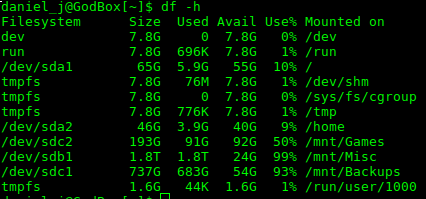
I love my setup and computer, I'd go ahead and provide some nice fancy images of both my setup and current desktop, but, I'm lazy.


All domains (that serve content) on my server now use SSL
2/3/2016
Thanks to LetsEncrypt all domains running on this server now enforce SSL.
Domains affected:
danieljon.es
xmx.fyi
dummiesman.com
tankfootball.com
This literally does nothing more for myself, or you than provide a fancy green lock in your browser, well, it does encrypt all your traffic, but we don't exactly provide services to many people.


