

Sorting images from log files
24/4/2017
Recently i've been wanting to collect and store images (mostly reaction images/anime screenshots) that have been posted in a specific IRC channel.
To accomplish this I decided to take the DIY route and create my own scripts/applications.
Collecting the images
The first issue I encountered was collecting the images from IRC logs. Being a Linux user I knew this wouldn't be too difficult, and it wasn't, infact it was amazingly simple. First thing to do was collect all the log files from ZNC and place them into a directory. This was done with the following command
cp ~/.znc/moddata/logs/zncname_servername_#channel* ~/whereever/you/want
With the logs collected the next step was parsing the urls of jpgs, gifs and pngs out of the logs. From there, a directory for the images we download has to be made. The last step is downloading the images, this was accomplished using wget with -i indicating a file of urls to download and --directory-prefix indicating the location images should be downloaded to.
This was done through the following bash script.
#!/bin/bash

echo 'run this in the directory containing all your logs (not recursive)'

cat *.log | egrep -o 'https?://[^ ]+.png' >> files.txt

cat *.log | egrep -o 'https?://[^ ]+.jpg' >> files.txt

cat *.log | egrep -o 'https?://[^ ]+.gif' >> files.txt

mkdir images

wget -i "files.txt" --directory-prefix=images
Sorting the images
With the thousands upon thousands of images collected (at this point I realised this project was unrealistic, I only continued because the application and scripts created are actually useful) I needed a way to name them. I like to keep my image names descriptive, perfect for finding them in a short period of time (aka sending them to people in response to questions). Using Qt and C++ I created a simple image viewer that supports GIF/PNG/JPG that allows me to select a directory and rename each image. Renamed images are moved into a directory named "sorted". You can also delete images, this was a crucial feature as a number of the images downloaded from the logs were not of any use to my collection.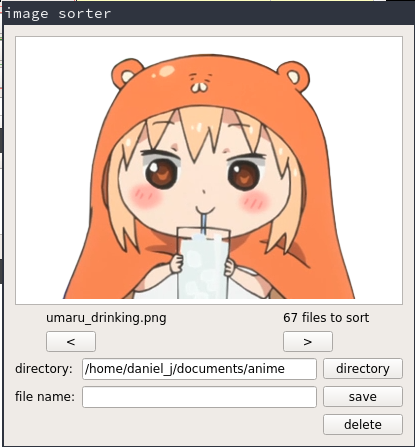
The code for this project can be found on GitHub


How I do what I do with my computer
29/3/2017
I've never gone in depth on how I use my computer and the things that I do every day, so i'm going to now.
My environment
For a few years now I have run only Linux and have found myself ending up on Arch Linux. I use the i3 window manager, I have not riced my computer, I find it to be unproductive and a hassle. I prefer to spend most of my time in the terminal, therefore I do not have a graphical file manager, I use a terminal-based music player, do my programming in vim and other things that don't need mentioning (password management etc). I use tmux for terminal multiplexing and I use lxterminal.i3 setup
I use dmenu for application launching, i3blocks as a status bar and heavily utilise i3 scripting for many of my system shortcuts.i3blocks
I currently utilise 7 desktops, each have their own purpose.- Main - This is used to store my web browser (conkeror) and terminals that I immediately use/need. This is also the desktop I store the game I play (only CSGO).
- Music - This desktop is dedicated ONLY to a single terminal running cmus.
- Steam - I use this desktop ONLY for storing the steam client.
- Videos - I use this desktop to store a terminal running Ranger (terminal filemanager) in which I open my anime/movies/whatever with, I also store the mplayer window here.
- Moderation - This desktop is dedicated ONLY to Reddit moderation windows. I run a second irssi session on this desktop connected to a Slack gateway. I have two FireFox windows open, each with their own dedicated reddit pages (mod queue, /new etc). This is ALL I use FireFox for, I use conkeror for my personal browsing.
- Programming - This desktop is where I run a single terminal session running tmux. I split the terminal into two, more details on how I do my programming will come later. I also run a conkeror session in this desktop that I use to access language documentation/stackoverflow.
Programming environment
In progress. Looking back on this post I probably wont ever finish it though.

New project implementations
1/3/2017
Over the last few days I have created two new projects that utilise the core concepts (and most of the code base) of two previousprojects - my RGB controller and CS:GO stat viewer.
The first project is a command-line implementation of my RGB controller. Using C++ and Qt (as with most of my other projects) a console application was created that allows me to send commands to my RGB controller (micro-controller based) over a serial connection.
The application expects at least two arguments: the first being the device to write to (serial port) the second a command to send. Each argument (delimited with a sapce) is sent, one after the other for processing on the micro-controller.
Example usage:
./rgb ttyUSB0 rf=100 rt=255 redfade
This command will connect to the serial device ttyUSB0, set the "red from" value to 100, thie "red to" value to 255 and toggle fading of the red LEDs. "red from" and "red to" means the red LEDs will fade from the value 100 to 255 repeatedly. If no arguments are given the program will give you al sit of available serial ports to select from.
The other project is a portable api using Qt libraries for accessing CS:GO api data easily. It requires you to provide a STEAM64ID, it then access the CS:GO api and parses and stores information in easily accessible variables and arrays.
Example usage (click on the image to make it bigger):


RGB controller revisted
16/2/2017
Over the past few days I have revisted my RGB controller project. The state of the project was stale and I didn't appreciate how I went about making the microcontroller side of things work. I began by revamping the microcontroller code, I changed how serial data was handled and parsed - this allowed me to add aditional functions other thaqn plain old R, G and B color modifications. I began experimenting with color fading, I thought the results were nice, however I had to taclke the issue of scheduling (psuedo multithreading), I managed to find a nice library that allowed me to do this easily. I integrated fading and many other options to go along with it (more on that later) and began revamping my user interface and the code behind the frontend of the project. To fit with the new data communication scheme I had to rewrite most of my communication functions, adding a few etc. Once this was done I integrated a new section to the user interface named "fade". Here is screenshot of the additions.
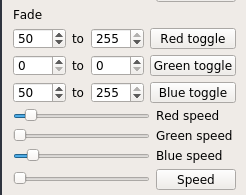
New features:
- red, green and blue color fading each with their own toggle buttons (can pause a specific color etc)
- individual color fading on their own timers (each color can fade faster or slower than the rest)
- minimum and maximum fade values from 0 to 255 available for each color
- speed control of all colors using one slider
This has been the only spark of motivation for programming i've had in a long time. This is ultimately depressing.

The end of 2016 and my future
7/12/2016
As 2016 comes to an end it's time to reflect upon the year. Drama wise, it has been the best yet, the US election specifically and lately, the Reddit drama with Spez - I love drama.
However, on a personal level, this year has been different from any other in many ways. I began 2016 motivated to finally be done with school, and it went well up until August, I was so close, literally weeks away. But I lost grasp of everything, I fell once again into a pit of depressive nothingness. During August I had broken my shoulder, I was in agony for around two or so months, not able to use my left arm. As a left handed individual this was incredibly depressing. I had to relearn how to do everything with only my right hand, I couldn't play CS:GO and I couldn't type at a reasonable pace with only my non-dominate hand. It was around October I was finally able to start re-using my left hand for basic tasks, I could finally shower and sleep without incredible pain. Around November I finally regained my left arm enough to do most things. To this day I still have shoulder pain when lifting things and sleeping on my side and fear it will never go away.
At this point all my school work was due, it had piled up during the last few months, I hadn't done any of it, I had to rush everything. I managed to complete my Research Project start to finish in only a week, I don't know how I managed. However it was too late. The deadlines had come and gone, and I told school to have me back for 2017. I fucking promised myself I wouldn't be in the same position at the end of 2016 as I was at the conclusion of 2015, but I am, once again I have spent a year and achieved nothing. Many other things have happened to me this year, all of which are personal and horrible, however you do not need to know any of it.
Ending on a positive note
This year hasn't been all bad. Around two months ago I had been accepted into a trial moderation program for the subreddit r/GlobalOffensive with around half a million subscribers, this is a subreddit dedicated to the only game I have ever truly enjoyed and have sunk nearly 2 thousand hours into - Counter Strike Global Offensive. I've spent the last four years of my life on IRC and with that came some moderation duties on the BeamNG IRC channel and I found it incredibly fun. When I noticed this particular subreddit accepting moderator applications I knew I had to apply. 0 expectations going in, as with everything in life of course, however this time I came out a winner. Fast forward a month out of the 11 accepted applicants I was one of the four accepted as a moderator. This is fun, the last two or so months have been entirely taken by moderating the subreddit and interacting with the community both via IRC and Discord. How long will this enjoyment last? Probably not long, but I shall enjoy it while it lasts.
Something different
30/10/2016
With another month gone by it is probably time for blog post.
School is continuing next year... I thought it'd be over this year, but I just was not up for the work. That's mighty depressing. It wont be all of next year, hopefully I will be done within the first semester.
I have done no programming this month which is mighty depressing, I need to start another project, but ideas have run dry.


I don't know what to do.
2/10/2016
I am currently in the home-stretch of recovering from my shoulder injury. I have limited, yet existing movement with my left arm and can use it for basic things, but it still hurts. I am use to doing this with my right arm now - I'm not sure if I will go back to using my left.
I have lately been playing CS:GO again. I have changed a lot of my config. My crosshair, sitting position and style, resolution, sensitivity all has been altered. I took this injury as a chance to rethink how I play as I was not progressing. I don't know if I will play CS:GO much longer. I love it, but at the same time I am sick of it.
Programming, something I love is always getting old for me. I have been using C lately and have made a cool thing or two, however ideas have stopped flowing and I am once again bored. I need a project, I need ideas.
2016 is nearing its end and I am in the same position as I was this time last year. I was supposed to be finished with highschool in 2016, however for reasons talked about before, I am here, at the end of 2016 still procrastinating, still wondering if I will complete. I am over it, sick of it, yet cannot find the motivation to finish it.
Maybe I am not motivated to finish because I don't know what the future holds? I want to become a software developer, programming is the only thing I really enjoy - but how. University is a stretch, the way I am completing high school does not lead into university - thus I'd have ot take one of the other routes, an extrance exam. But, that leads to another issue. Software development courses have math knowledge requirements that far surpass my knowledge. I have nto taken any of the prerequisit classes.
I don't know where to go from here, but what I do know is my media/posts seem to have a constant pattern of being a month apart, this is not intentional, it has just happened that way.
Does anyone read these media/posts? Who am I really talking to, maybe my future self, or maybe a future employer looking into my online history? Don't worry, just stay here and on GitHub.


Broken shoulder, everything is on hold.
1/9/2016
Unfortunately a few weeks ago I had somewhat of an accident and broke my left shoulder - my dominant arm. This has made just about everything difficult. I have not had a good nights sleep in weeks and I cannot do anything I enjoy. I am in a sling for another 10 weeks, lets hope it goes fast.
No CS:GO or programming makes Daniel something .. something.
But, negativity out of the way, some cool new things have come about since my last post.
IRC Web client
I have now installed QWEBIRC onto this server which allows you to connect to my IRC network via your web browser.You can find the service here.
File hosting
I now run a temporary file hosting service - perfect for when you need to share small files with others over the internet. You can find the service here.CS:GO stats viewer
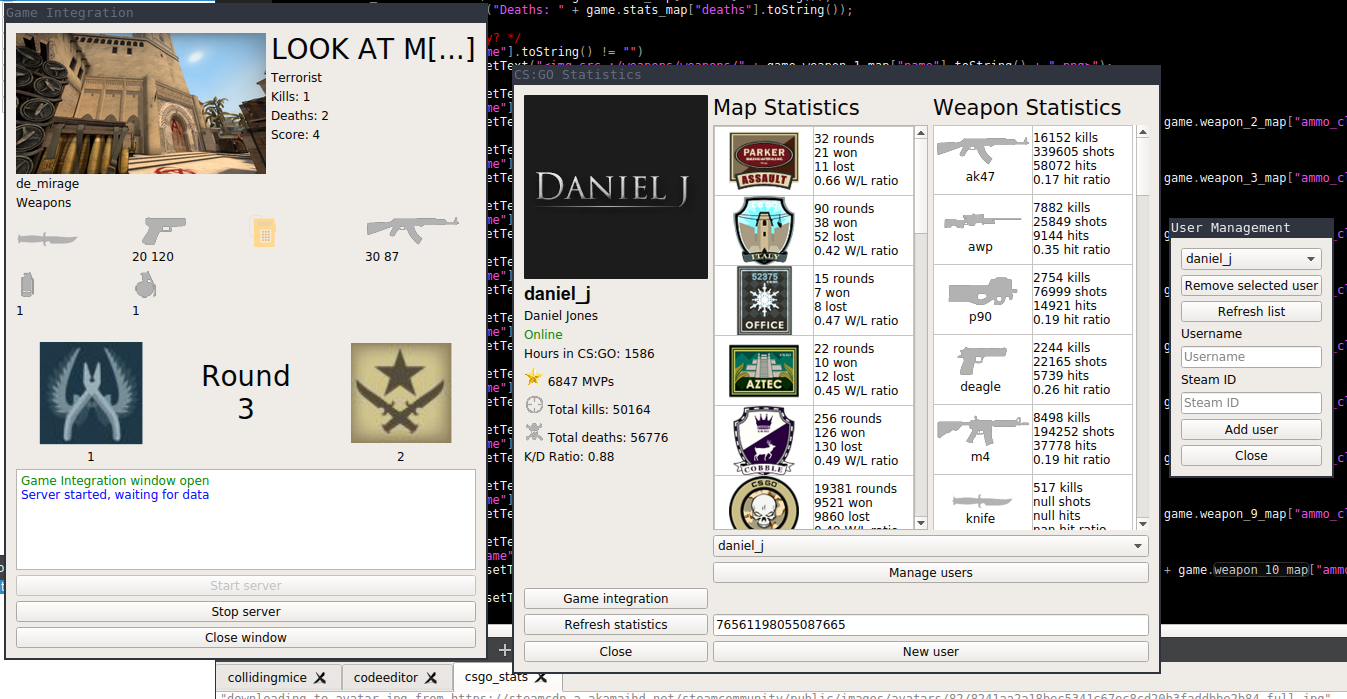
A lot of work has gone into my stats viewer since I last talked about it.The biggest is game integration. Game integration sues the local CS:GO API provided to give real-time in-game statistics about your current match.
However, since I cannot play CS:GO for the time being because of my shoulder, work on this project has been halted. You can find the project on GitHub.


CS:GO Stats viewer
1/8/2016
For the past week or so I have been working on a new project that displays a users Counter Strike: Global Offensive in-game statistics.
Using Steam's API a user is given access to an abundant amount of statistics about a given users Steam account and in-game information, in the case of a Valve owned title CS:GO, much of this information is of great importance to a player trying to improve their overall skill and performance.
I have utilised this API to its full advantage and have designed a multi-platform program that can present this information to you in a user-friendly manner.
This project was written using C++ and the QT framework, the code is open source and available on GitHub.
Features
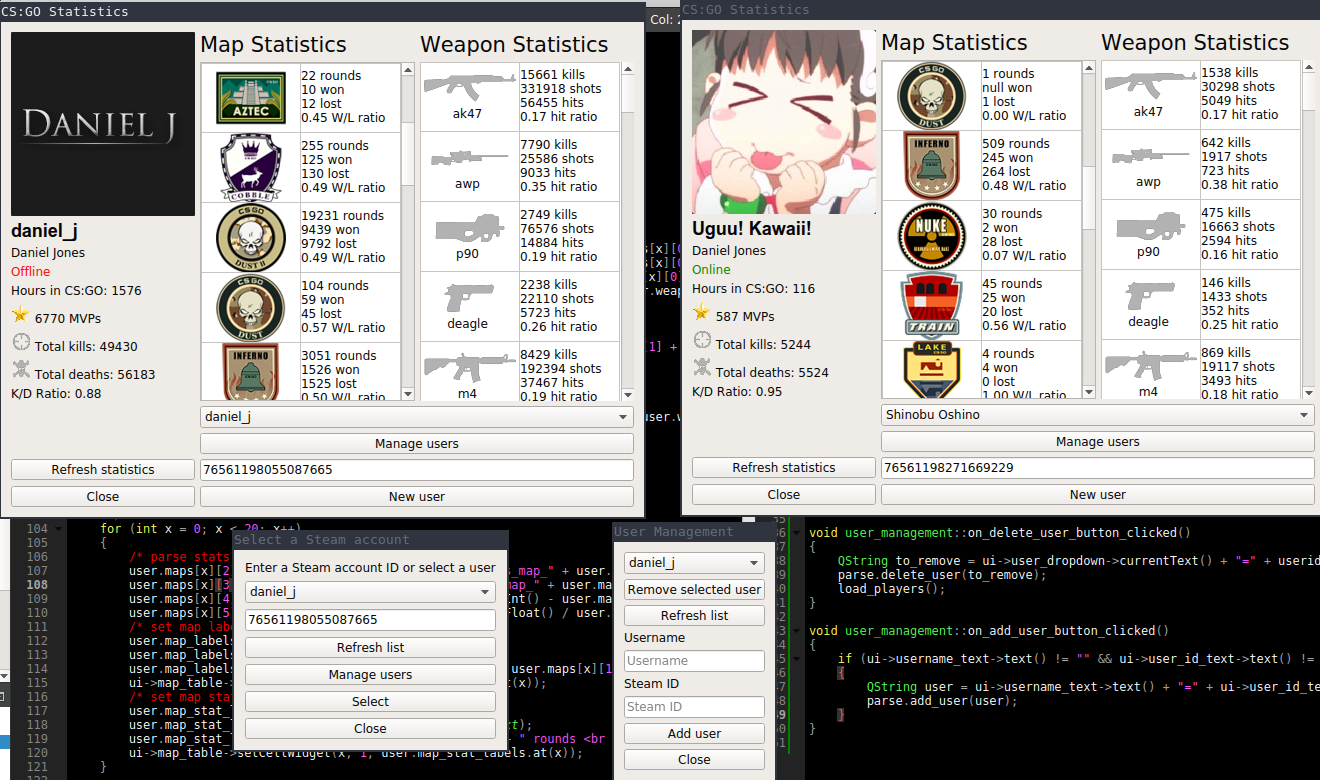
- Profile selection - choose, edit, delete and save any number of users for quick access to their statistics. These profiles are written to file and saved for later use. (select the user you want to view from the dropdown menu)
- In-depth Weapon statistics including the total number of kills, shots, hit and your shots/hits ratio.
- In-depth Map statistics including total rounds played, rounds lost/win and the ratio of wins to losses.
- Generic Steam profile statistics such as your profile picture, username, real name and time played in CS:GO
- Other important CS:GO information such as MVPs earned, total kills achieved, total deaths and your kill/death ratio.
Here is what the UI currently looks like - there are three copies open, one showing my main CS:GO account, the other my alt and the last the user interfaces for selecting and editing users stored on disc.


My RGB LED project - something I actually enjoy working on.
1/7/2016
For a while now I have been working on my RGB controller and have made some great progress - the most recent being that of presets. The ability to load, select, save and delete presets has been one I have wanted for a long time yet have never actually attempted to do.
This project allows me to control my rooms RGB LED lighting from software I have written on my computer. This project uses a combination of C/C++ and the Qt library, the LED strip itself is powered by an Arduino - the two way communication is achieved via serial libraries. This project is being featured in a major school project about serial communication - I may post that project here at some point. This project can be found on GitHub. This is the current state of the UI.